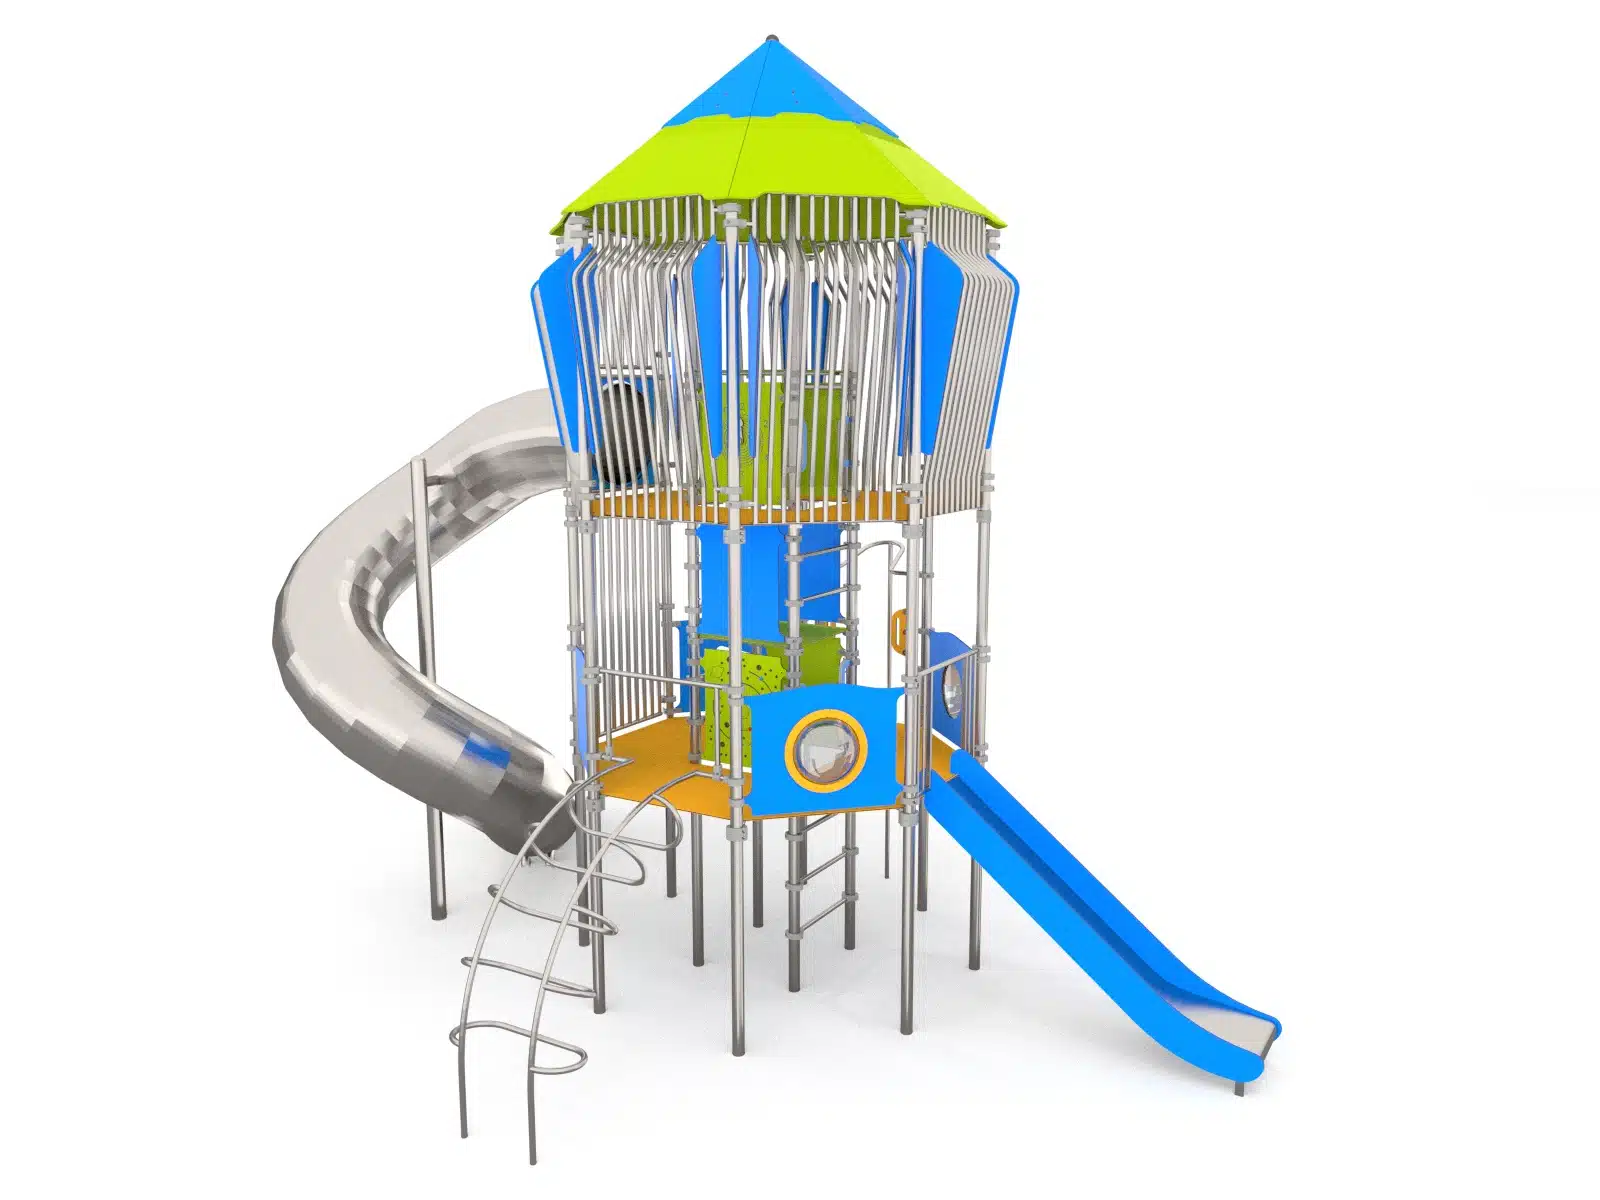
Towers

Sometimes bigger is better! Towers are a unique statement piece in any playspace and can be themed to match almost any aesthetic. These kinds of structures can ignite a sense of magic and adventure to the surrounding environment and open a whole host of play possibilities for several age groups.
- AE 40-1001-Y
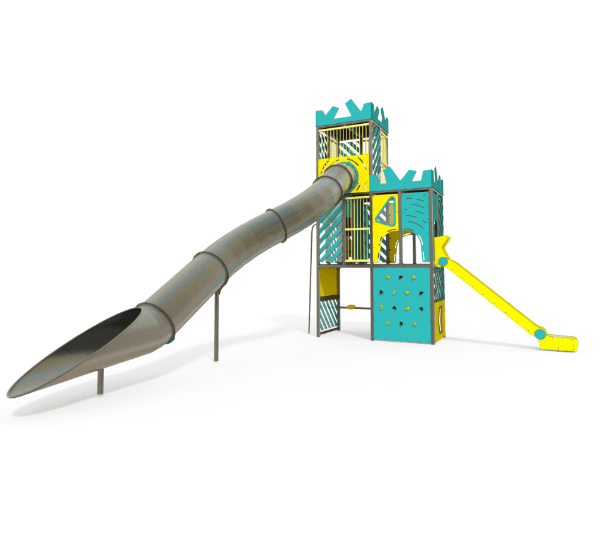
Aerial Tower A
Height: 6.63m Width: 7.04m Length: 11.64m Fall Zone Area: 51m2 Free Height of Fall: 2m  AE 40-1001-Y
Aerial Tower A
Height: 6.63m Width: 7.04m Length: 11.64m Fall Zone Area: 51m2 Free Height of Fall: 2m - AE 40-1002-T01
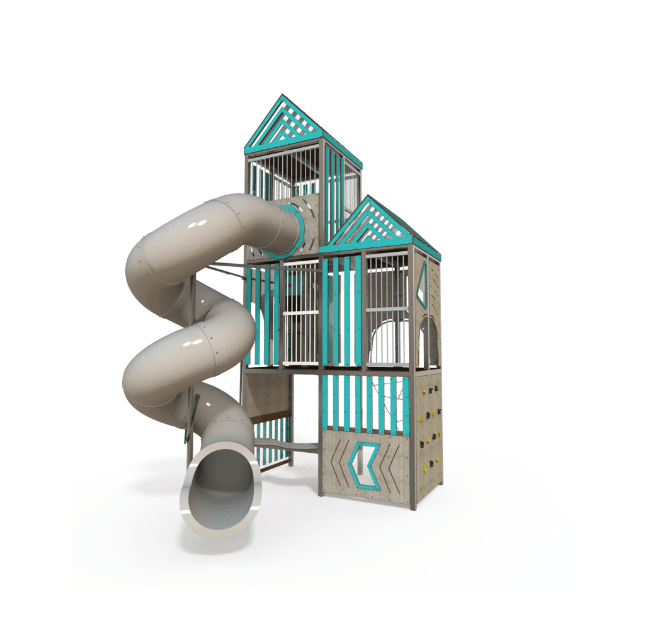
Aerial Tower B
Height: 6.95m Width: 3.91m Length: 5.79m Fall Zone Area: 8m2 Free Height of Fall: 2m  AE 40-1002-T01
Aerial Tower B
Height: 6.95m Width: 3.91m Length: 5.79m Fall Zone Area: 8m2 Free Height of Fall: 2m - AE 40-1002-Y24
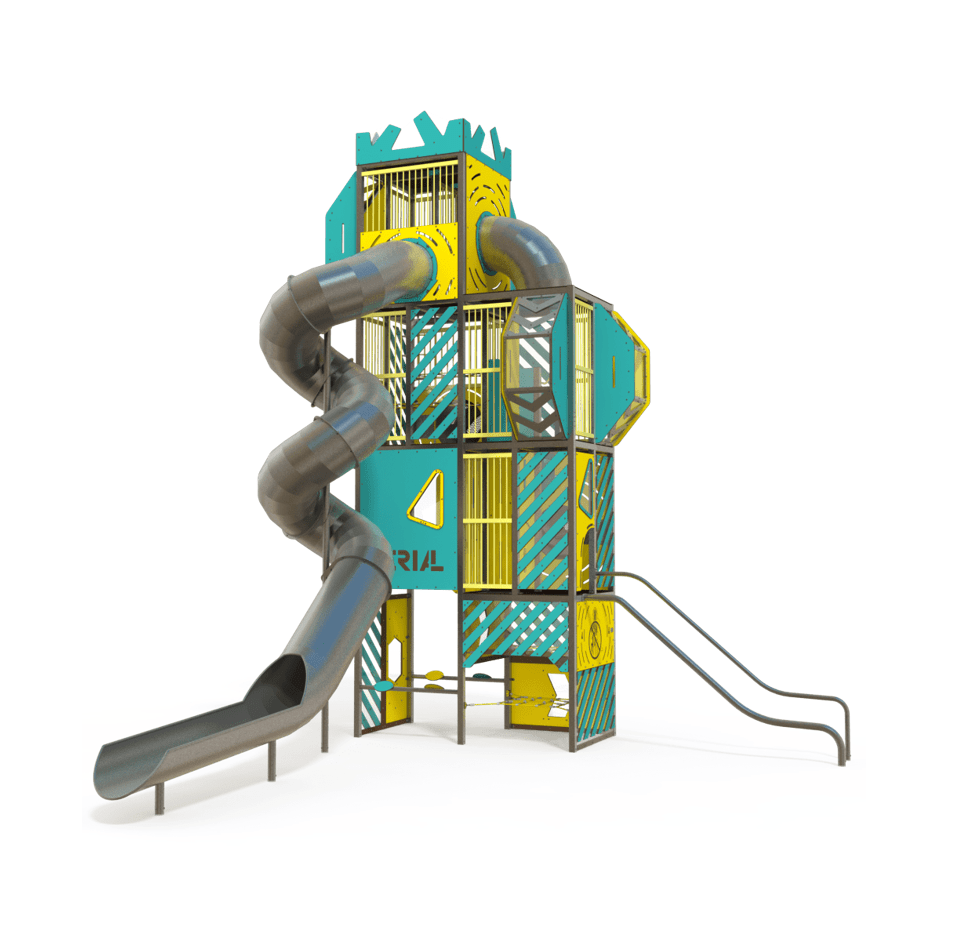
Aerial Tower C
Height: 6.63m Width: 3.91m Length: 5.79m Fall Zone Area: 49m2 Free Height of Fall: 2m  AE 40-1002-Y24
Aerial Tower C
Height: 6.63m Width: 3.91m Length: 5.79m Fall Zone Area: 49m2 Free Height of Fall: 2m - AE 40-2001-Y24
Aerial Tower D
Height: 6.63m Width: 8m Length: 12.48m Fall Zone Area: 74m2 Free Height of Fall: 2m  AE 40-2001-Y24
Aerial Tower D
Height: 6.63m Width: 8m Length: 12.48m Fall Zone Area: 74m2 Free Height of Fall: 2m - AE 60-1001-Y24
Aerial Tower E
Height: 8.63m Width: 7.09m Length: 9.02m Fall Zone Area: 94m2 Free Height of Fall: 2.28m  AE 60-1001-Y24
Aerial Tower E
Height: 8.63m Width: 7.09m Length: 9.02m Fall Zone Area: 94m2 Free Height of Fall: 2.28m - AE 60-1002-T01
Aerial Tower F
Height: 8.59m Width: 8.98m Length: 15.09m Fall Zone Area: 150m2 Free Height of Fall: 1m  AE 60-1002-T01
Aerial Tower F
Height: 8.59m Width: 8.98m Length: 15.09m Fall Zone Area: 150m2 Free Height of Fall: 1m - AE 60-1002-Y24
Aerial Tower G
Height: 8.59m Width: 9.02m Length: 15.09m Fall Zone Area: 150m2 Free Height of Fall: 1m AE 60-1002-Y24Aerial Tower G
Height: 8.59m Width: 9.02m Length: 15.09m Fall Zone Area: 150m2 Free Height of Fall: 1m - AE 60-1003-Y12
Aerial Tower H
Height: 8.63m Width: 4.34m Length: 9.02m Fall Zone Area: 71m2 Free Height of Fall: 2.28m AE 60-1003-Y12Aerial Tower H
Height: 8.63m Width: 4.34m Length: 9.02m Fall Zone Area: 71m2 Free Height of Fall: 2.28m - AE 60-2001-Y24
Aerial Tower I
Height: 8.63m Width: 11.67m Length: 12.75m Fall Zone Area: 186m2 Free Height of Fall: 2.28m AE 60-2001-Y24Aerial Tower I
Height: 8.63m Width: 11.67m Length: 12.75m Fall Zone Area: 186m2 Free Height of Fall: 2.28m - AE 60-2003-Y99
Aerial Tower J
Height: 8.58m Width: 10.65m Length: 11.67m Fall Zone Area: 162m2 Free Height of Fall: 2.28m AE 60-2003-Y99Aerial Tower J
Height: 8.58m Width: 10.65m Length: 11.67m Fall Zone Area: 162m2 Free Height of Fall: 2.28m - AE 60-3001-Y24
Aerial Tower K
Height: 8.63m Width: 14.14m Length: 16.58m Fall Zone Area: 259m2 Free Height of Fall: 2.28m AE 60-3001-Y24Aerial Tower K
Height: 8.63m Width: 14.14m Length: 16.58m Fall Zone Area: 259m2 Free Height of Fall: 2.28m - AE 60-4001-Y07
Aerial Tower L
Height: 8m Width: 9.17m Length: 16.48m Fall Zone Area: 209m2 Free Height of Fall: 2m AE 60-4001-Y07Aerial Tower L
Height: 8m Width: 9.17m Length: 16.48m Fall Zone Area: 209m2 Free Height of Fall: 2m - 1431
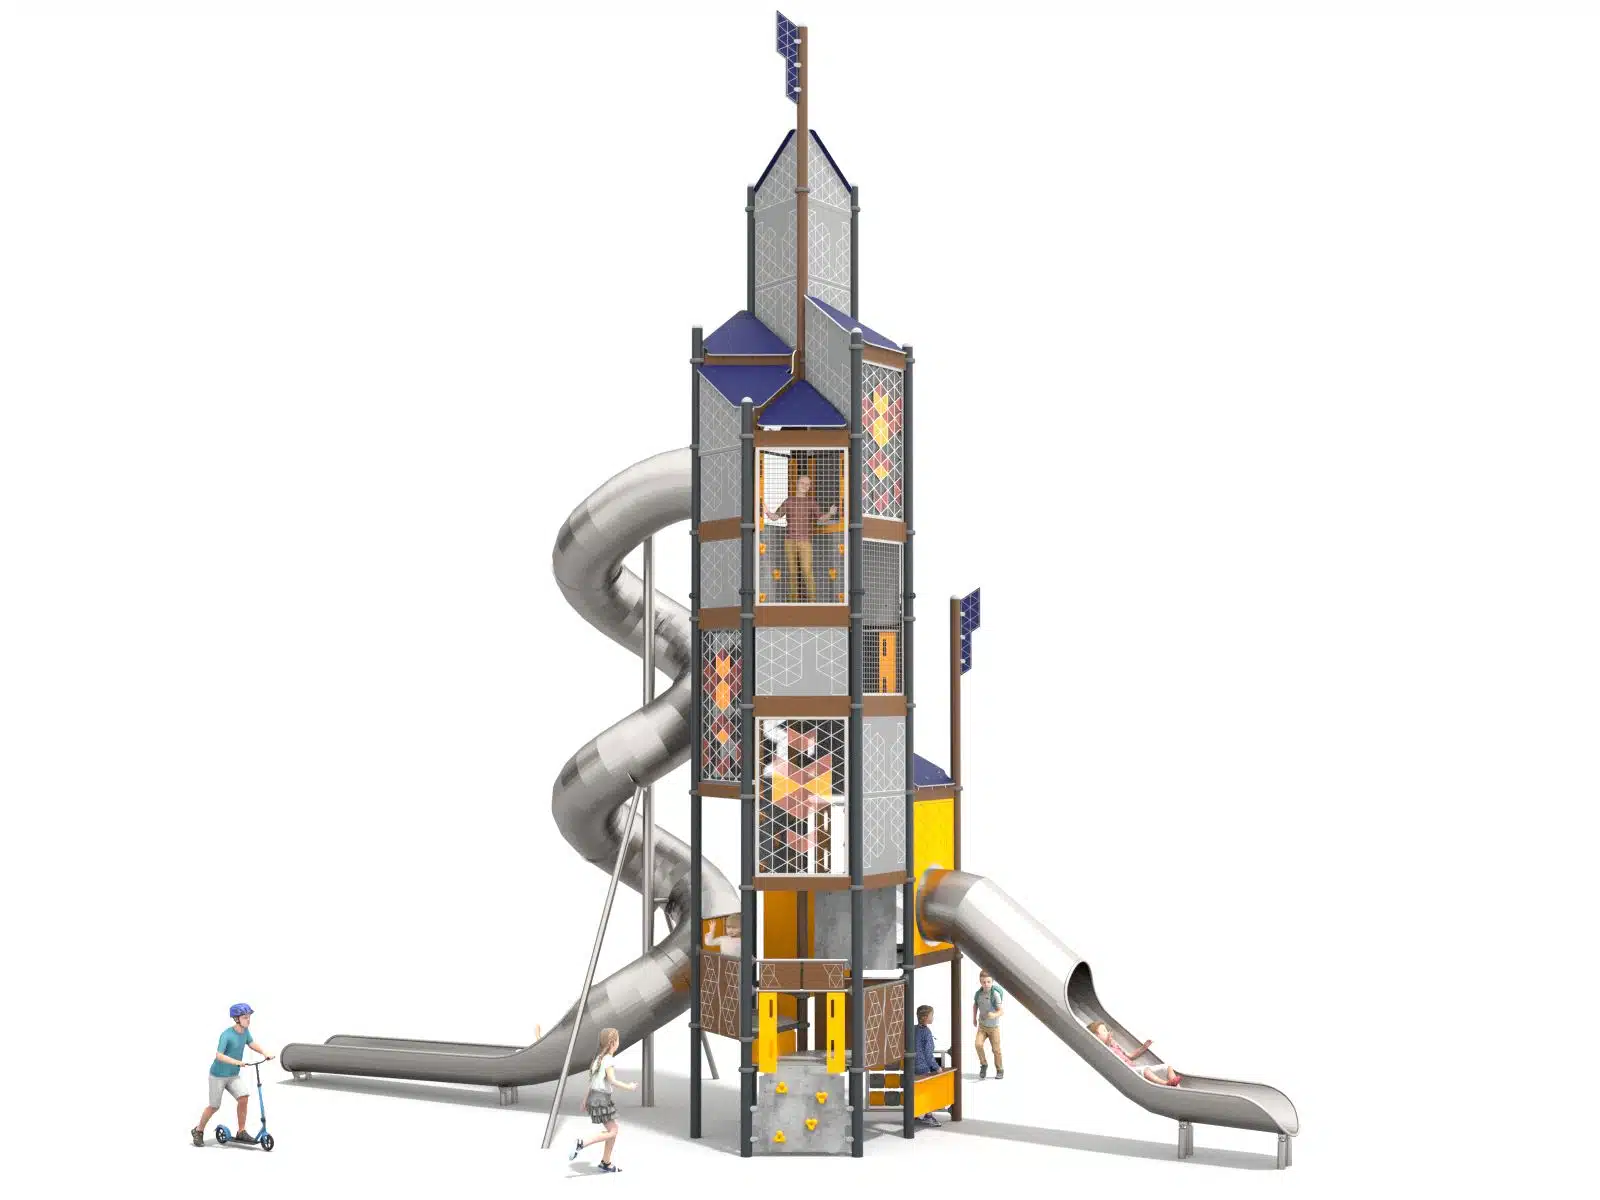
Castle Slide Tower
Height: 9.41m Width: 5.22m Length: 12.40m Fall Zone Area: 86m2 Free Height of Fall: 0.16m  1431
1431Castle Slide Tower
Height: 9.41m Width: 5.22m Length: 12.40m Fall Zone Area: 86m2 Free Height of Fall: 0.16m - 1423
Double Pyramid Tower
Height: 5.66m Width: 11.82m Length: 10.59m Fall Zone Area: 108.50m2 Free Height of Fall: 1.8m  1423
1423Double Pyramid Tower
Height: 5.66m Width: 11.82m Length: 10.59m Fall Zone Area: 108.50m2 Free Height of Fall: 1.8m - CDP-104
Double World Cup Tower
Height: 12.7m Width: 17.2m Length: 14.45m Fall Zone Area: 186m2 Free Height of Fall: 1.35m  CDP-104
Double World Cup Tower
Height: 12.7m Width: 17.2m Length: 14.45m Fall Zone Area: 186m2 Free Height of Fall: 1.35m - 1402
Fire Station Tower
Height: 1.62m Width: 9.01m Length: 11.66m Fall Zone Area: 122.7m2 Free Height of Fall: -0.11m 1402Fire Station Tower
Height: 1.62m Width: 9.01m Length: 11.66m Fall Zone Area: 122.7m2 Free Height of Fall: -0.11m - CDP-120-P
Jellyfish Tower
Height: 6m Width: 14.75m Length: 9.05m Fall Zone Area: 160m2 Free Height of Fall: 0.65m  CDP-120-P
Jellyfish Tower
Height: 6m Width: 14.75m Length: 9.05m Fall Zone Area: 160m2 Free Height of Fall: 0.65m - CDP 109-P
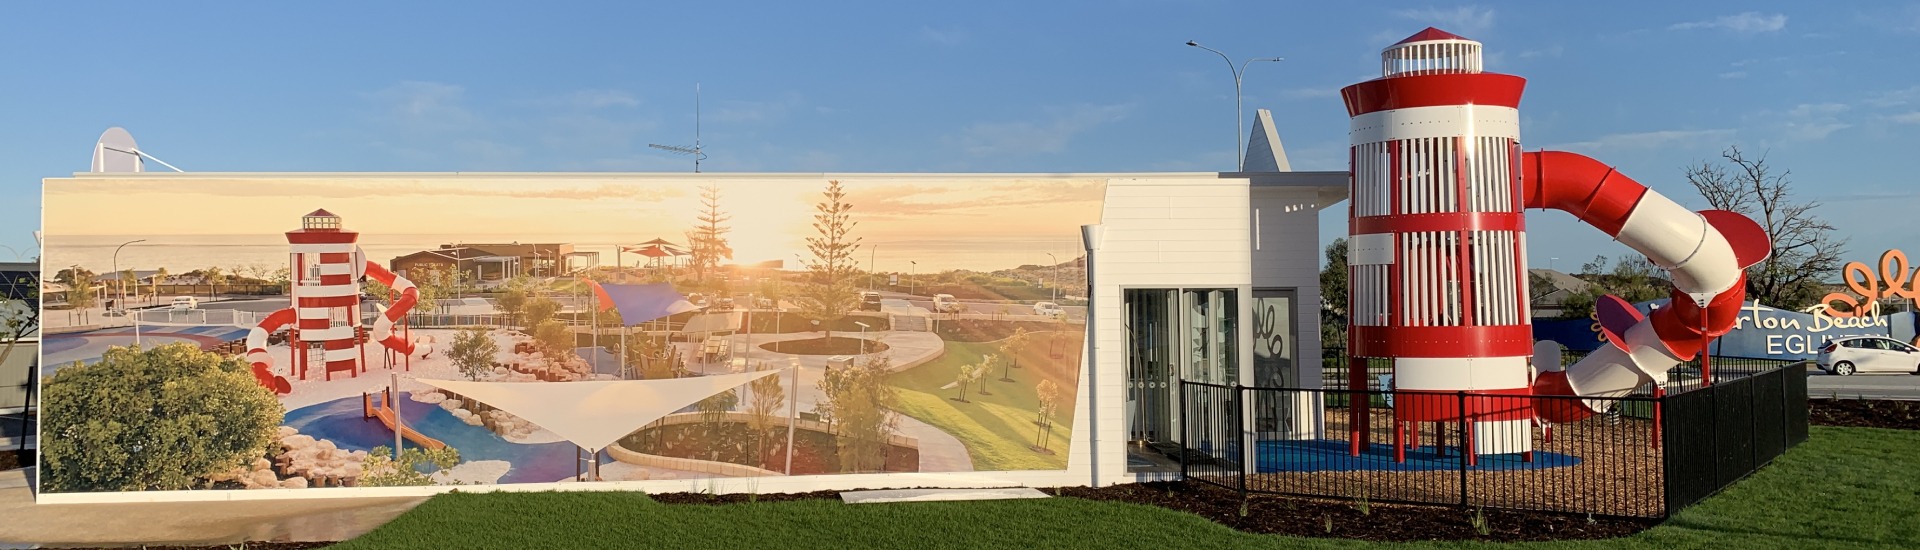
Lighthouse Tower
Height: 10.85m Width: 8.4m Length: 10m Fall Zone Area: 95.1m2 Free Height of Fall: 1m  CDP 109-P
Lighthouse Tower
Height: 10.85m Width: 8.4m Length: 10m Fall Zone Area: 95.1m2 Free Height of Fall: 1m - 1403
Medieval Castle Tower
Height: 8.62m Width: 9.21m Length: 12.65m Fall Zone Area: 121.5m2 Free Height of Fall: 1.95m 1403Medieval Castle Tower
Height: 8.62m Width: 9.21m Length: 12.65m Fall Zone Area: 121.5m2 Free Height of Fall: 1.95m - 1410
Mega Castle Tower
Height: 11.72m Width: 4.44m Length: 11.90m Fall Zone Area: 61m2 Free Height of Fall: 1.50m 1410Mega Castle Tower
Height: 11.72m Width: 4.44m Length: 11.90m Fall Zone Area: 61m2 Free Height of Fall: 1.50m - 1691
Nautical Tower
Height: 8.35m Width: 7.27m Length: 11.66m Fall Zone Area: 100m2 Free Height of Fall: 1.50m 1691Nautical Tower
Height: 8.35m Width: 7.27m Length: 11.66m Fall Zone Area: 100m2 Free Height of Fall: 1.50m