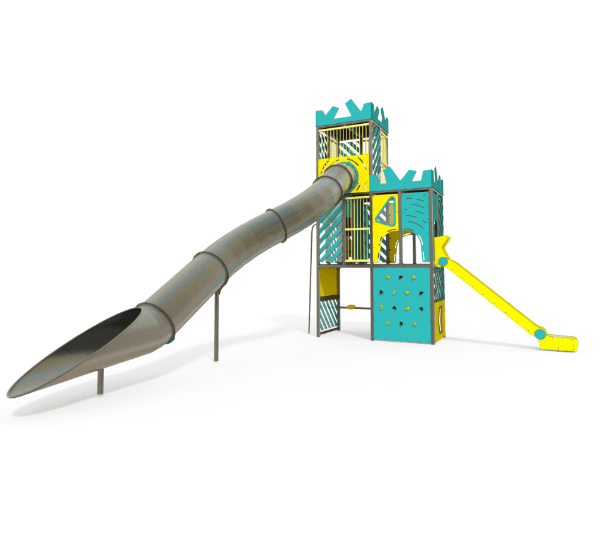
Aerial Tower M

Aerial Tower M
Product Specifications
- Height: 8m
- Width: 9.12m
- Length: 12.58m
- Free Height of Fall: 2m
Related Products
- GGWS 1009-P
Witch Series 7
Height: 9.20m Width: 5.40m Length: 9.45m Fall Zone Area: 117.00m2 Free Height of Fall: 2.25m  GGWS 1009-P
Witch Series 7
Height: 9.20m Width: 5.40m Length: 9.45m Fall Zone Area: 117.00m2 Free Height of Fall: 2.25m - AGFS 210-P
The Fantastic Series 7
Height: 4.65m Width: 5.45m Length: 5.20m Fall Zone Area: 55.00m2 Free Height of Fall: 2.20m  AGFS 210-P
The Fantastic Series 7
Height: 4.65m Width: 5.45m Length: 5.20m Fall Zone Area: 55.00m2 Free Height of Fall: 2.20m - CDP 103
The World Cup Tower
Height: 10.00m Width: 10.1m Length: 10.5m Fall Zone Area: 123.2m2 Free Height of Fall: 1.35m CDP 103The World Cup Tower
Height: 10.00m Width: 10.1m Length: 10.5m Fall Zone Area: 123.2m2 Free Height of Fall: 1.35m - AE 40-1001-Y
Aerial Tower A
Height: 6.63m Width: 7.04m Length: 11.64m Fall Zone Area: 51m2 Free Height of Fall: 2m  AE 40-1001-Y
Aerial Tower A
Height: 6.63m Width: 7.04m Length: 11.64m Fall Zone Area: 51m2 Free Height of Fall: 2m